11 things you may have overlooked when you made your website live
So, your website is up...
A student of mine recently put up their first website and asked me if they'd missed anything. I thought it would be useful to put up a checklist of things that are very easily overlooked and forgotten about when you put your shiny new site live.
It's easy to get excited when you make a website available to the public, you see it working and see visitors going to it you might think you're done. However, even when you have a completely working website there are some things you might have forgotten to do.
1. Validate your HTML and CSS
I've started with the obvious one. Validate the HTML and CSS for your pages, experienced developers will do this throughout the development cycle but it's worth doing a final check when (or ideally just before) the website is made live.
To validate your HTML check the W3C HTML valiator, and for your CSS use their CSS validator.
2. Check your 404 error page and the HTTP response codes.
Validate that you have a meaningful 404 error page by vising a page on the website that doesn't exist.
In addition, open up the developer tools, go to "Network" and check that it's actually returning a 404 (Not found) HTTP status code.

Finally, open one of the pages that does exist (e.g. the home page) and check it's correctly returning a 200 (OK) status code.
3. SSL Certificate
Thanks to Let's Encrypt and certbot, getting an SSL certificate has never been easier and best of all it's free! There's no excuse not to be using SSL.
There are plenty of guides online for setting up certbot and getting SSL working, here's one that covers the basics.
4. Beef up your SSL with HSTS, SSL Stapling and CAA (and get A+ on SSL Labs)
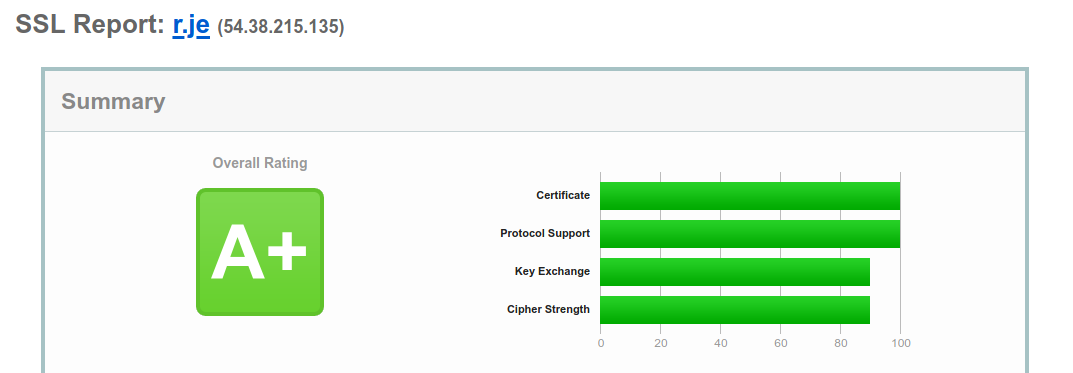
Certbot does a good job of including a sensible set of defaults for SSL but there's room for improvement.
Try scanning your site with SSL Labs Server Test. There are a few things missing in the default configuration.
4.1. HSTS
HTTP Strict Transport Security (HSTS) is a header that tells the web browser to expect this website to use SSL for the next year. If someone visits the site again, and it doesn't have SSL, they will see an error. This is helpful against guarding man-in-the-middle attacks that reduce the protocol to HTTP to avoid an SSL error.
If you just want an A+ in SSL Labs, enable HSTS. This can be done in nginx with the following configuration:
server {
    ...
    add_header Strict-Transport-Security "max-age=31536000;" always;
}
4.2 SSL Stapling
By default, when someone connects to your website on SSL, the browser also connects to the organization which issued the certificate (e.g. Let's Encrypt) to check to see if it the certificate on your site is genuine. Hey, Let's Encrypt, did you really issue this certificate for r.je?.
This slows down the connection as the browser has to connect to your site and the site which issued the certificate.
With SSL stapling, your server periodically validates its own certificate with the issuer and stores the response. It can then send the response directly to the person who connected to your site (For the security conscious, this does seem like a security hole, it's only a very minor one as the hole only exists until the response expires).
To enable this with nginx and certbot, firstly renew your certificate with the --must-staple flag:
certbot renew --must-staple --rsa-key-size 4096
Then configure nginx to support SSL stapling:
server {
    ...
    ssl_session_cache shared:SSL:10m;
    ssl_trusted_certificate /etc/letsencrypt/live/example.org/chain.pem;
    ssl_stapling on;
    ssl_stapling_verify on;
    resolver 1.1.1.1;
}
Note: You won't have the chain.pem file unless you ran certbot with the --must-staple flag!
If you are running certbot in docker, you'll have to run it inside the container:
docker exec -it [container id] certbot renew --must-staple --rsa-key-size 4096
4.3 DNS CAA
The final thing to do to improve your SSL security is to use DNS Certification Authority Authorization (DNS CAA).
Imagine a man-in-the middle attack where someone was running a fake site on your domain. Someone could issue fake certificates for your domain (Thus making the HSTS check irrelevant).
You can tell certificate authorities which authority you wish to allow to create certificates. To do this you can add a CAA DNS record with the following value:
0 issue "letsencrypt.org"
Certificate Authorities will then check this DNS record and only grant certificates if they are in this list.
As far as I know, browsers do not look at these records when determining certificate validity.
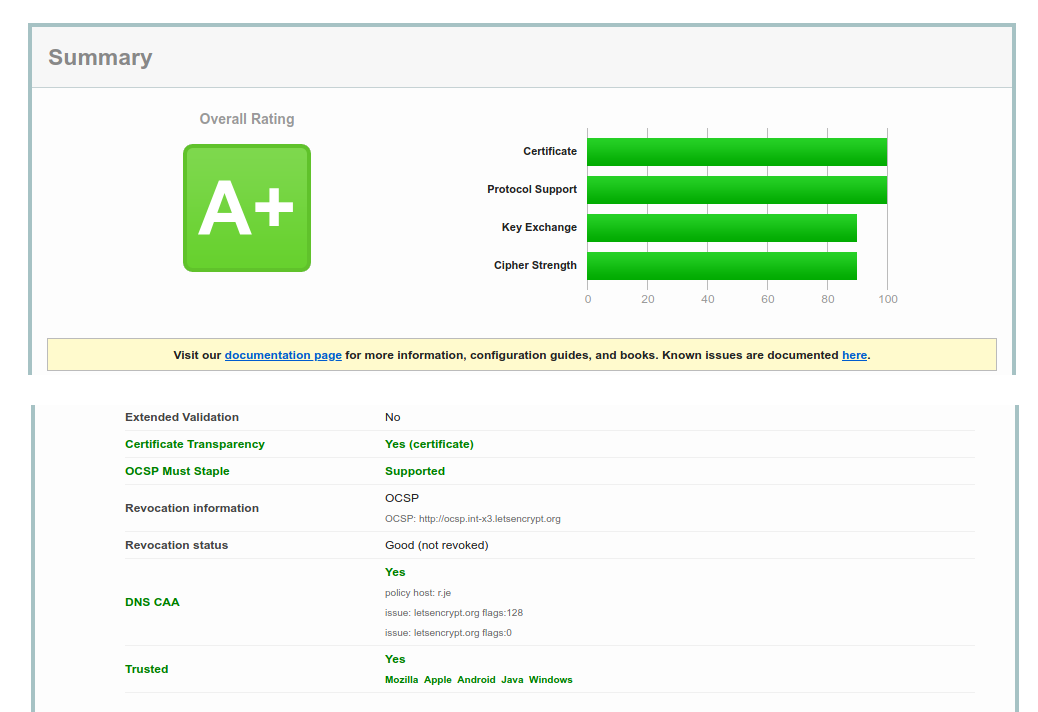
4.4 Done!
If you've done all three steps above, you should have an A+ on SSL Labs and you should see CAA and Stapling enabled:
5. Enable HTTP/2 (and configure HTTP/2 Push)
Make sure your site is using HTTP/2 so that you can take advantage of HTTP/2 push. To do this, your site must be using SSL (which if you've followed this guide you'll be using anyway) and then it's just a matter of turning it on. In nginx you just add http2 to the listen directive:
server {
    listen 443 ssl http2;
}
Once you've got HTTP/2 running you can make use of HTTP/2 push which enables you to send CSS, JavaScript and images in the same HTTP request as your HTML, making your website load faster.
I've written about how to set up HTTP/2 push previously here.
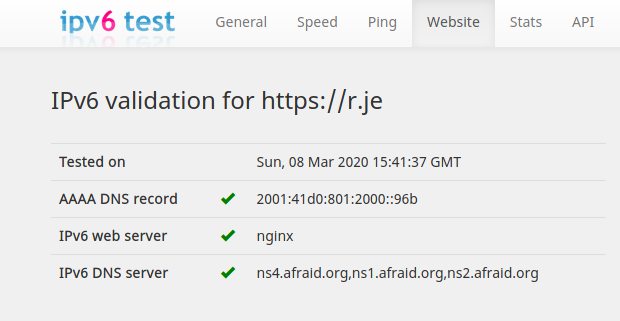
6. Make sure your server is listening on IPv6
When you got your server, VPS, hosting account, etc, you were given an IP address. You then went to your DNS provider and created an A record pointing your domain name to your IP address.
In your excitement, you probably forgot that you were also given an IPv6 address. You'll want to ensure your site is listening on IPv6 as well as IPv4.
- Add the
AAAArecord in your DNS provider to point your domain to the IPv6 address - Configure your web server to use IPv6. Make sure your IPv6 address is associated with the web server. There are too many variations of how to do this for me to go into detail here, but there's an example here for RHEL/CentOS 7-8.)
- Remember to update the firewall. Depending on your server OS, you might have to manually open ports 443 and 80 for IPv6 in addition to IPv4.
- Configure your web server to listen on IPv6. In nginx this is done with the
listendirective so you'll have two listen directives for each server block:
server {
    listen [::]:443 ssl http2;
    listen 443 ssl http2;
    ...
}
If you're using Apache or *shudder* IIS, refer to the documentation on how to do this.
Finally, if your site is running in docker, you also need to configure docker to use IPv6. Amend /etc/docker/daemon.json to include:
{
    "ipv6": true,
    "fixed-cidr-v6": "2001:db8:1::/64"
}
You can check your site correctly supports IPv6 on https://ipv6-test.com.
7. Security enhancing HTTP headers: X-Content-Type-Options, X-Frame-Options, X-XSS-Protection
Your server should be configured to send the following HTTP headers:
I won't go into what each of these does here as they are well documented on MDN. But you should configure your web server to include these headers with relevant options.
In nginx this can be done by adding the following to your server block:
server {
    ...
    add_header X-Frame-Options DENY;
    add_header X-Content-Type-Options nosniff;
    add_header X-XSS-Protection "1; mode=block";
}
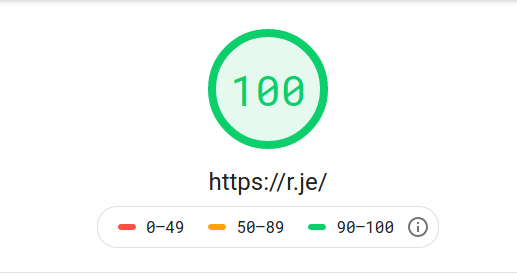
8. Check your website performance.
I recommend checking your website performance using Google PageSpeed Insights and WebPageTest.org.
Ideally you'll get a high score in each one. If not, they offer suggestions on what you can do to improve. One of the simplest is configuring HTTP/2 push as mentioned above.

9. Your website should be accessible on 4 different URLs
This one is really easy to forget to check. Assuming you're running your site on https://example.org and that's where you expect visitors to come to, you might have already set up the redirect from the www URL to the non-www URLs.
However, you'll need to remember that your site should be accessible on all 4 of these URL:
- http://example.org
- http://www.example.org
- https://www.example.org
- https://example.org (primary URL)
There are a couple of things to check here:
The first three should all redirect to https://example.org if you can view the pages on multiple URLs and they are not redirecting you will lose SEO performance. Make sure the first 3 URLs correctly redirect to the primary URL by opening each in your browser and making sure you can't see, for example, https://www.example.org in the address bar as it should have been redirected to https://example.org
The easiest thing to overlook here is that https://www.example.org needs a valid, correctly configured SSL certificate even though it's just redirecting to https://example.org.
Bonus points: Remember that all 4 URLs should also be accessible via IPv6 so don't forget to configure your server to listen on IPv6 for all four of these URLs.
10. Secure sshd
You probably access the server via SSH. Have you done what you can to mitigate the risk of an unauthorized person being able to log in?
There are plenty of guides on this so I won't cover this here but the most important security measures are:
- Disable root logins
- Use public/private key authentication
- Disable password authentication
11. Backups
I've left the most important one until last.
Imagine your server crashed and all the data on it was lost permanently:
- Would you be able to get the site back up and running?
- Where is your backup stored?
- How frequently are backups taken? (E.g. if all the data was lost would your backup contain a snapshot from 24 hours ago, a week ago, a month ago, etc)
- What is backed up? The source code? The database? The server configuration?
- What steps do you need to take to restore the site on a completely new server?
- Are you sure your backup can be restored?
- How long would your site be down from the moment you knew there was an issue?
If you're unable to answer one or more of these questions, I recommend doing a dry-run. Pretend your data was irrecoverably lost and you had to restore from backup. It's better to know the answers to these questions now than when you're panicking about your data loss.
How did you do?
How many of these had you remembered to do on your site? If you got 11/11 well done!